
Disk Encryption
Why full disk encryption? If your laptop is ever stolen with sensitive data on it, the person who stole it could retrieve every bit of data stored on that laptop, regardless of if it is password protected. It is crucial that any device that contains sensitive data and is transported off district property utilize full disk encryption. With full disk encryption, the data on the device would be worthless to any person who stole it without the users password.
WINDOWS
For Windows first we need to verify that you are running Windows Pro. To verify this we need to run a tool called “System Information”. To do that, you will click on the Start Menu, and then start typing “System Information” without the quotes.
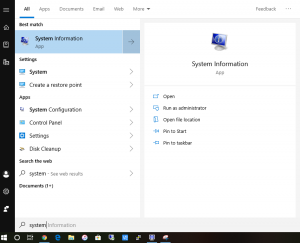
Once you launch System Information, check on the Windows Version located next to OS Name.
![]()
Specifically you are looking for the “Pro”. Most computers ordered through a approved District quote should have this.
If you have a “Pro” version of Windows 10 or Windows 8, then you should be able to set up Full Disk Encryption through BitLocker. No, this is not Ransomware, it is a built in Windows utility that provides full disk encryption, that only you can decrypt.
If you don’t have a “Pro” version of Windows, please reach out to the technology department for a quote. Upgrading is inexpensive and easy.
Next, you will want to again click on the start menu and type “Bitlocker”
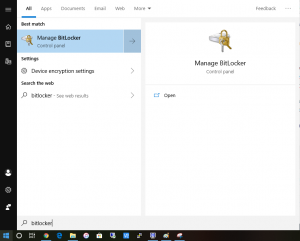
You want to then launch the “Manage BitLocker”.
You should then see the drives you have in your system. You will want to “Turn On BitLocker” on any drive where you store sensitive data. For most of you, this will only be on the C: Drive, or the Operating System Drive.
After you have clicked on “Turn On BitLocker” and authenticated yourself, Windows may ask you to save your private key to your Microsoft account or other location. We recommend you do this so that if for some reason you forget your password, you will not loose access to your files. Afterwards you should see a screen like this:
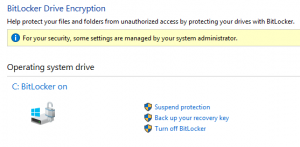
Indicating that BitLocker is On.
At this point, Windows will start encrypting your drive, it may take some time to encrypt all the files you already have on your drive, but Windows will do this silently in the background for you.
MAC OS X
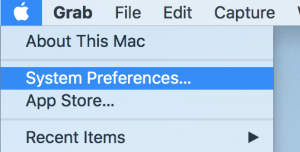
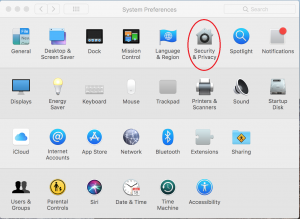
In Mac OS X, you will need to start buy clicking on the Apple Menu in the top right hand corner and select “System Preferences…”
Once the “System Preferences” window opens, you should locate and click on “Security & Privacy”
Afterwards, click on the “FileVault” tab at the top, and click “Turn On FileVault”. It will ask you to save a private key, and we recommend that you do that. If not, and you forget your password you will be unable to access your files.
Once everything has been setup correctly, the FileVault panel will look like this:

CHROMEBOOK
On by default.
IPAD
On by default, just make sure to lock your device with a good pass-code (preferably one longer than the standard 4 digits)